.png)
Introduction
Shield is Fasterize's WAF control panel. It allows you to manage several protection mechanisms applied to your traffic directly from the Fasterize console: access control, custom security rules, traffic throttling, managed WAF protections, bot management, and security headers.
Shield does not rely on a general security level such as “low,” “medium,” or “high.” Each protection feature is an independent component that you can configure according to your site’s needs.
However, these building blocks do not operate in isolation. They are executed in a specific order, and certain decisions made earlier in the process can affect subsequent safeguards.
It is therefore essential to understand this order before you begin configuring Shield.
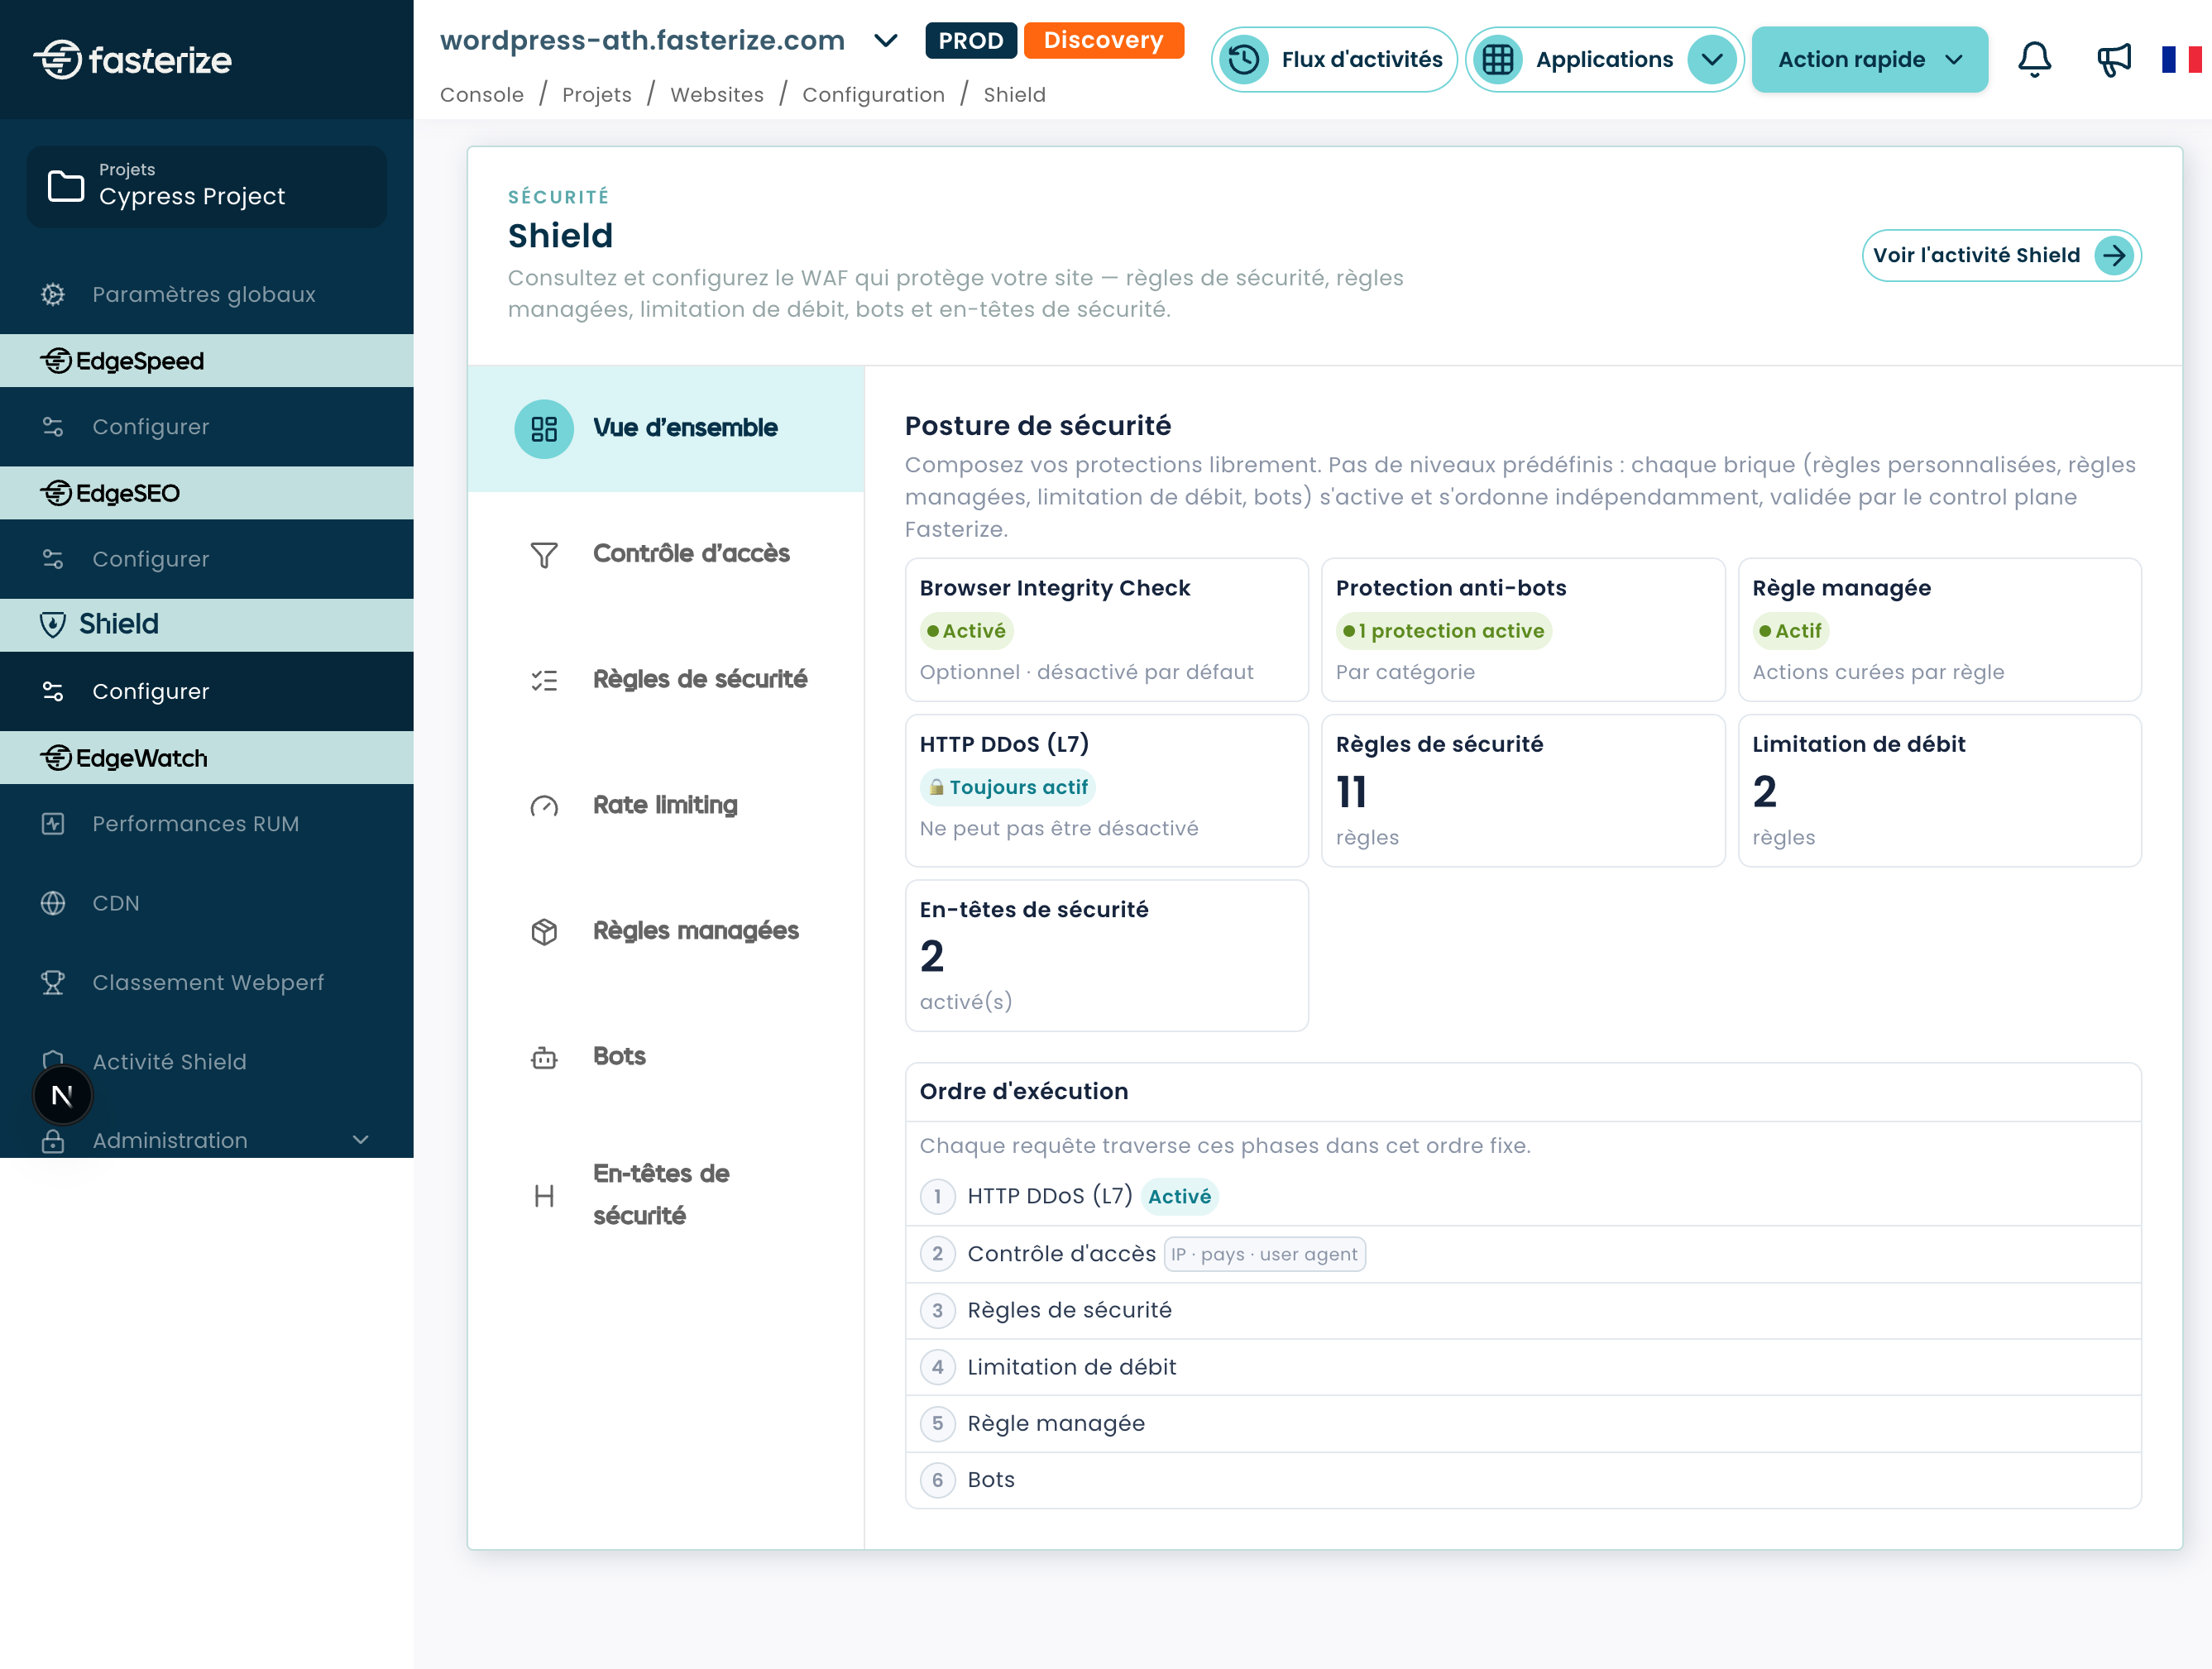
In what order do the Shield protections apply?
When a request arrives at your site, it passes through the Shield protections in a specific order.
The command displayed in the console is as follows:
- HTTP DDoS (L7)
- Access Control
- Safety Rules
- Flow Limitation
- Managed Rules
- Bots
L7 HTTP DDoS protection is the first line of defense and remains active at all times.
Security headers work differently from other modules: they do not constitute an additional step in filtering the request. They act on the HTTP response returned to the browser.
The order of execution is important because a decision made early in the chain can affect the behavior of safeguards further down the line.
This is particularly true of the stock skip Available in the Security Rules: When this rule applies, the remaining security rules, rate limiting, managed rules, and bot protection are bypassed for this request.
⚠️ An exception that is too broad or incorrectly positioned may prevent certain protections from taking effect. Always check the order of the building blocks and the order of your rules.
After a change is made, the configuration is validated and then propagated. The interface can already display the desired status during this phase: the change becomes effective once the deployment is complete.
How does the Safety Rules procedure work?
Within the Security Rules module, the rules are evaluated from top to bottom.
The principle is that of "first match" for actions that terminate evaluation: when a request matches a rule that applies a terminating action, the subsequent rules are no longer evaluated in that context.
💡 Important exception: log does not interrupt the evaluation. The rule is logged, and the subsequent rules continue to apply. This allows traffic to be monitored without altering its processing.
This feature is especially useful when creating a new rule: you can start by reviewing the corresponding queries with log, then refine your query before applying a more restrictive action.
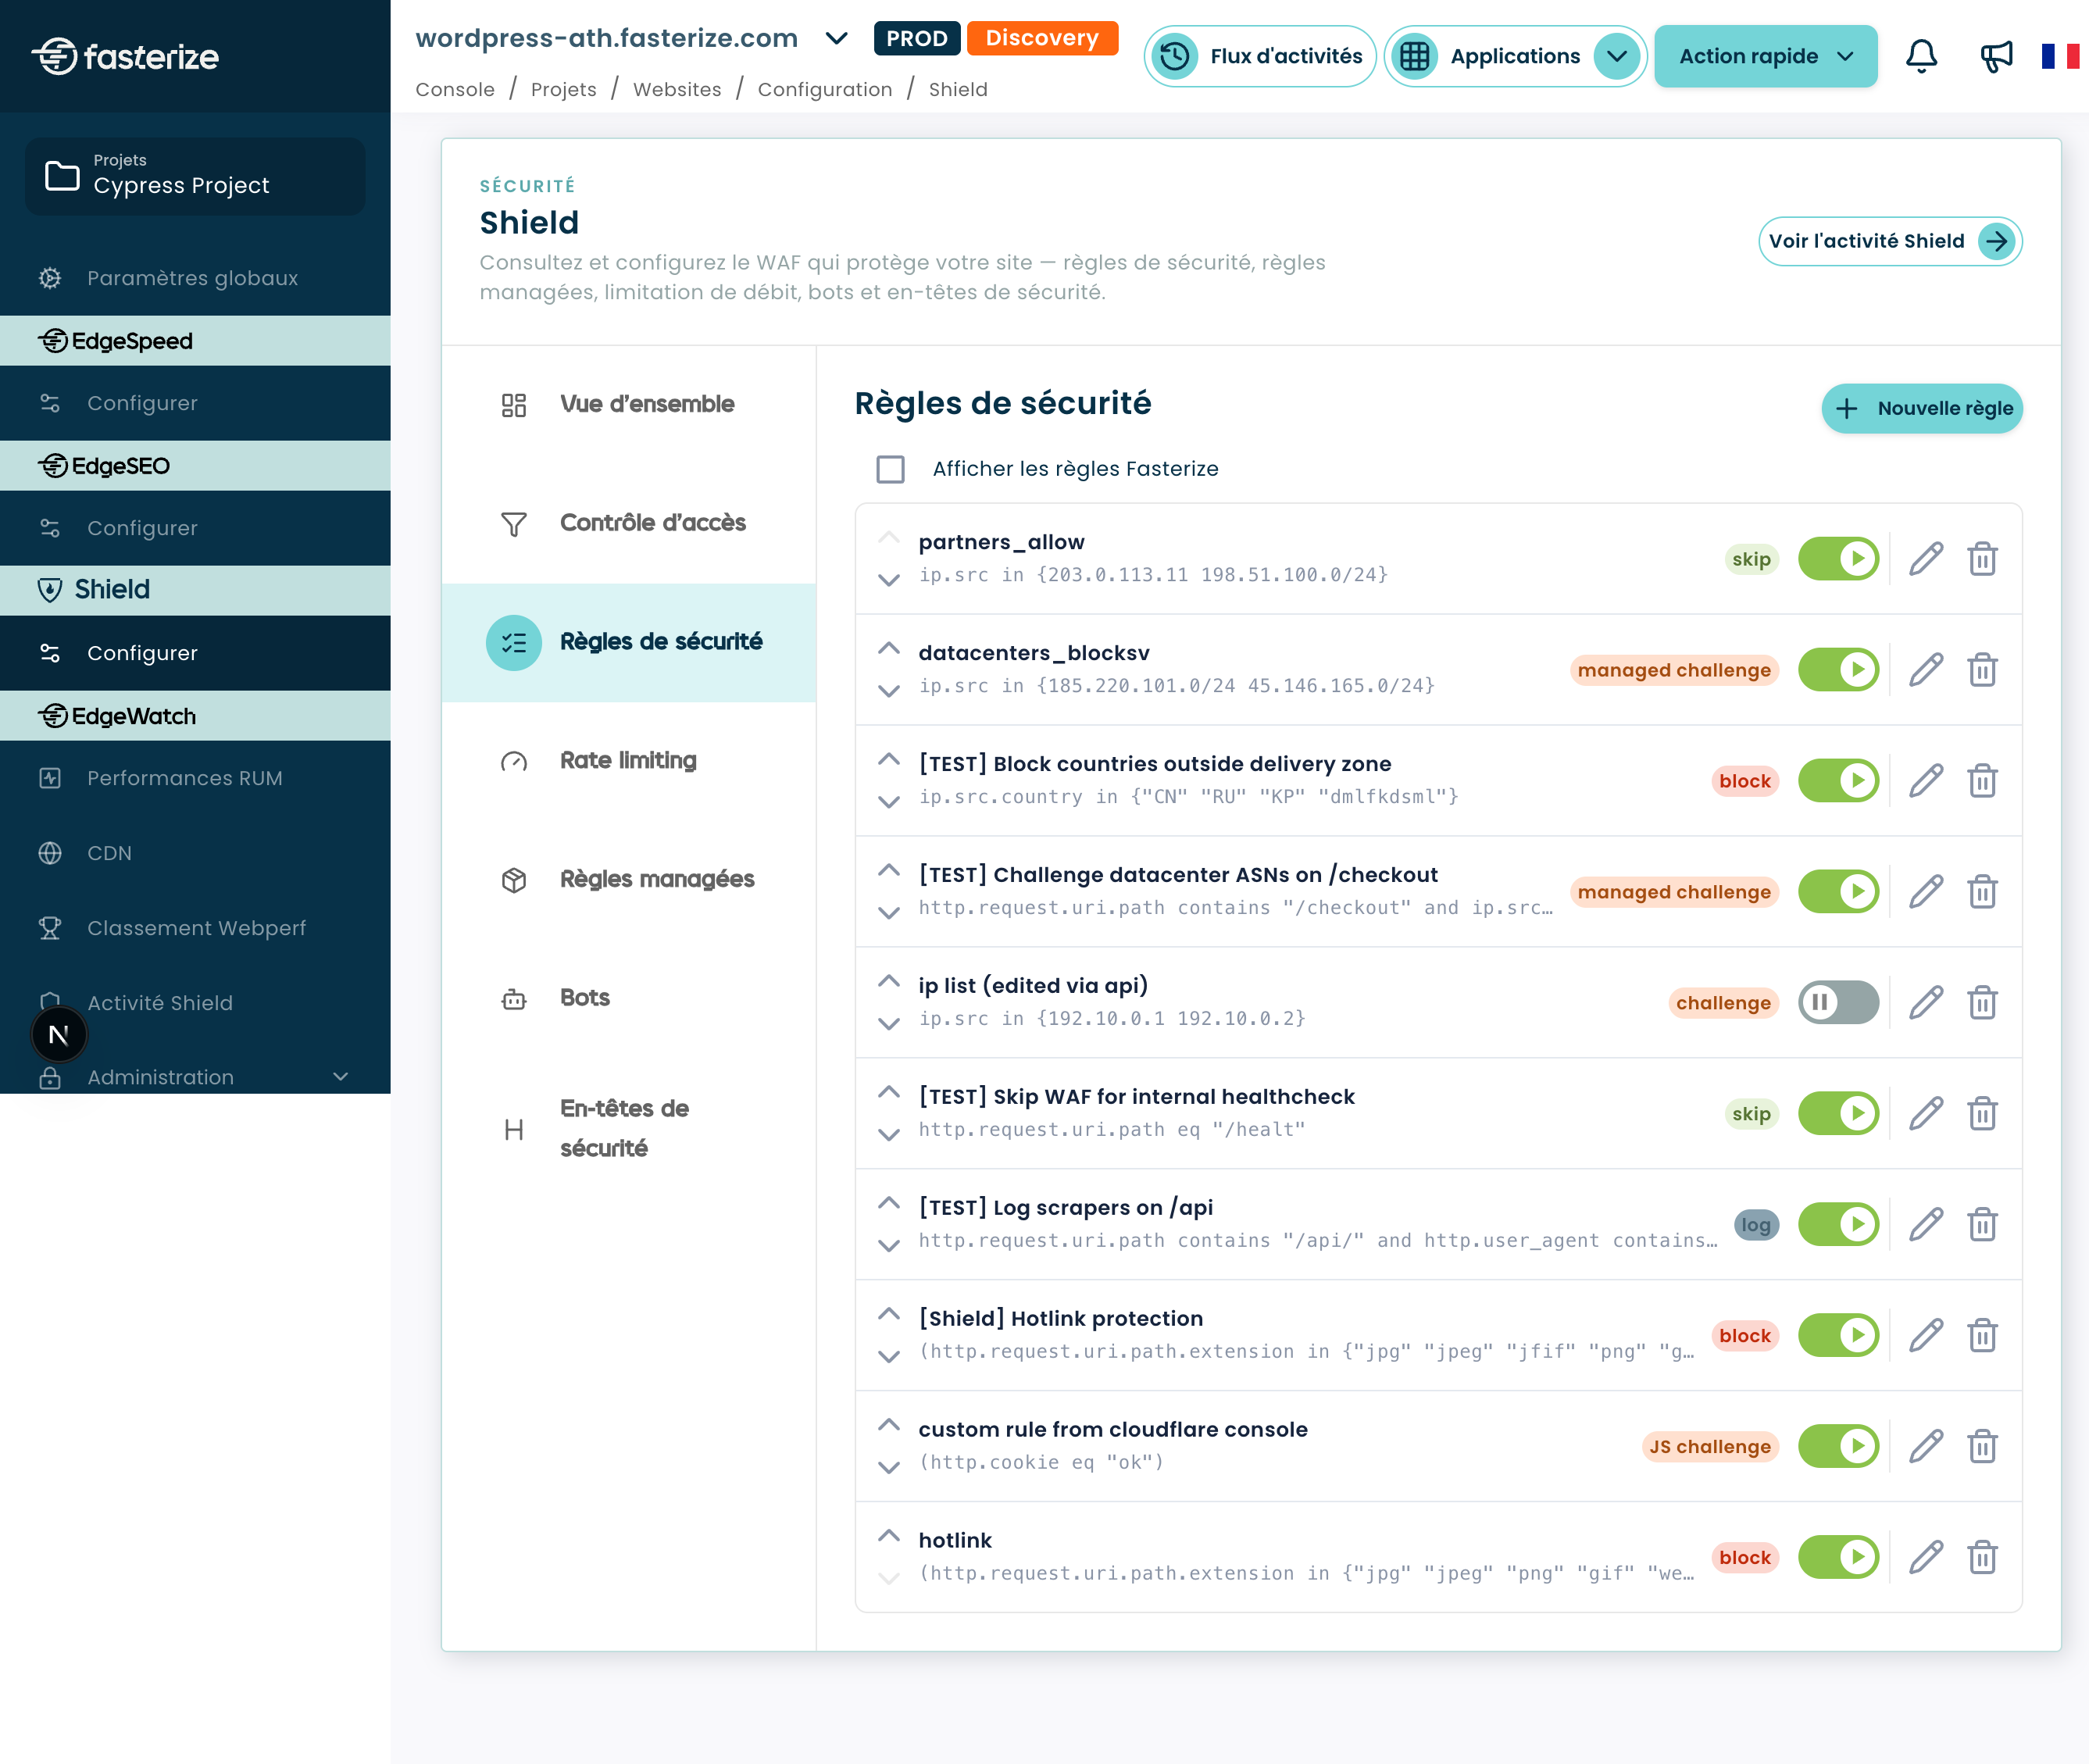
The order of the rules therefore has a direct impact on their behavior.
How can you quickly manage access with Access Control?
Access Control is the first configurable layer of Shield after HTTP DDoS (L7) protection.
It allows you to create lists of allowed or blocked items based on three criteria available in the console:
- Client IP;
- Country;
- User agent.
For each category, you can specify which items you want to allow or deny access to.
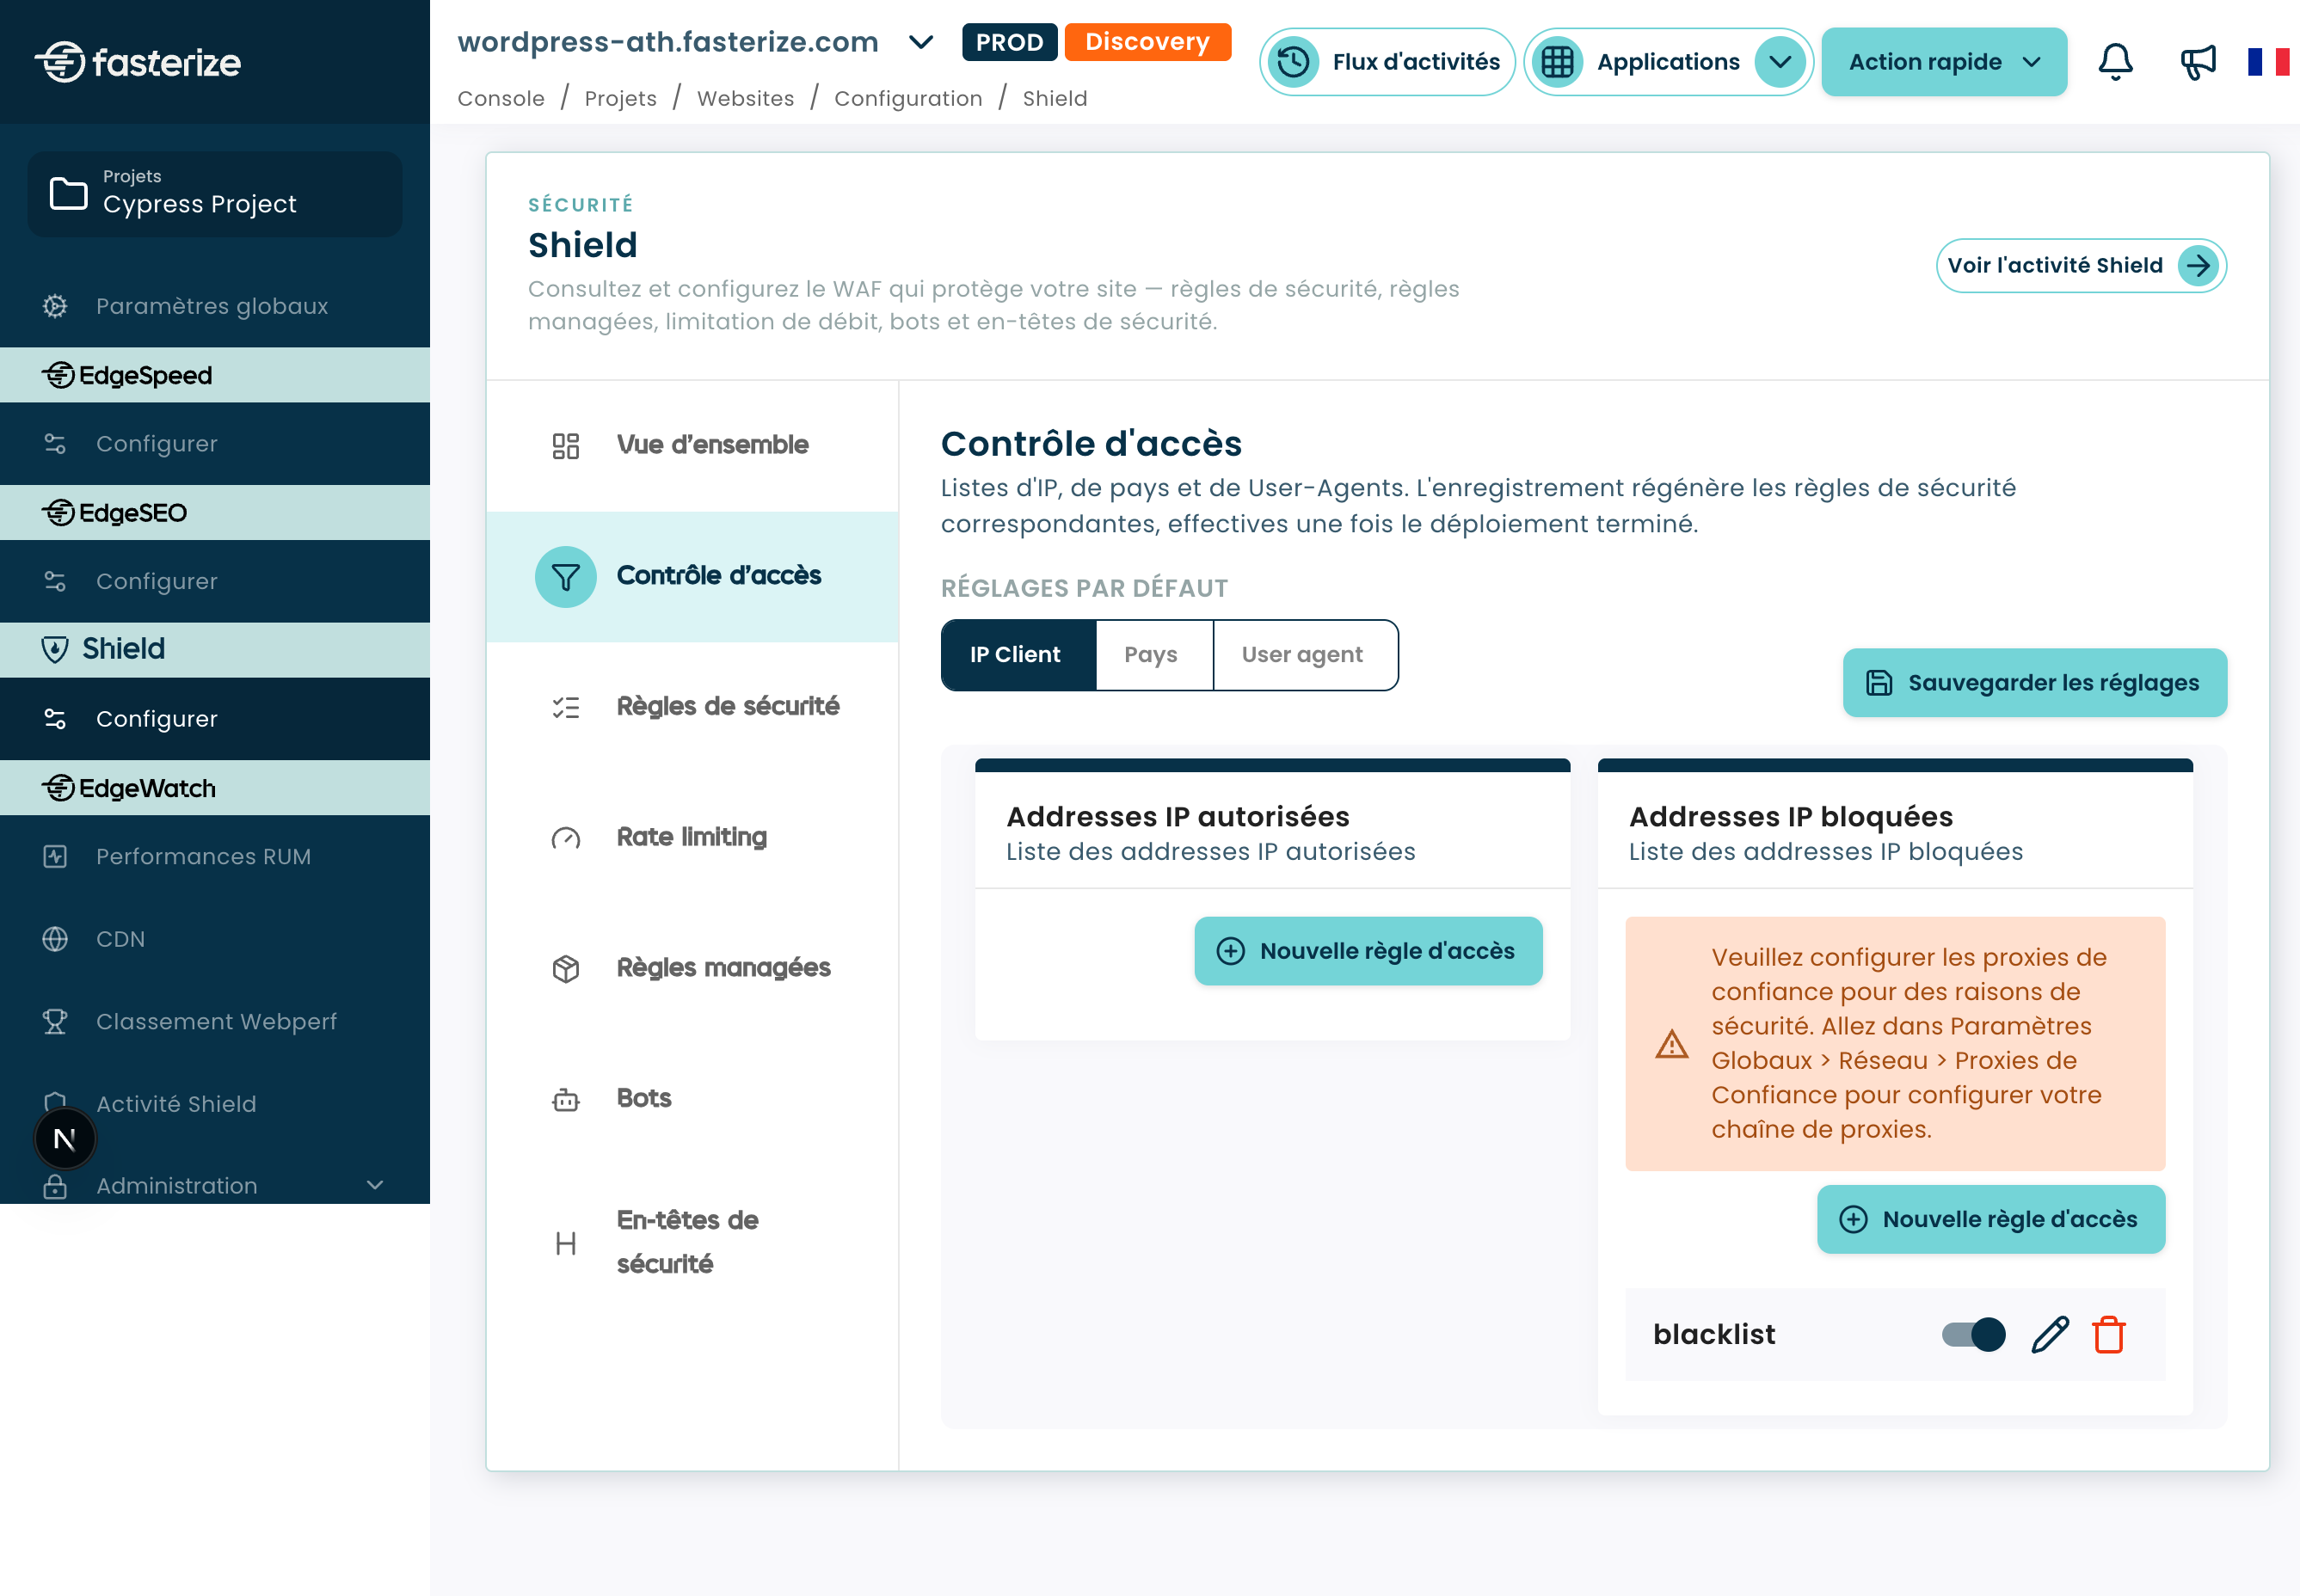
Once you've made your changes, click the "Save Settings" button. As with other Shield configurations, the changes take effect after they are deployed.
How do I create a custom security rule?
Security Rules allow you to precisely intercept certain requests and take an action when a pattern matches.
A rule includes, among other things:
- a name;
- an expression defining the relevant queries;
- one share;
- an enabled or disabled state.
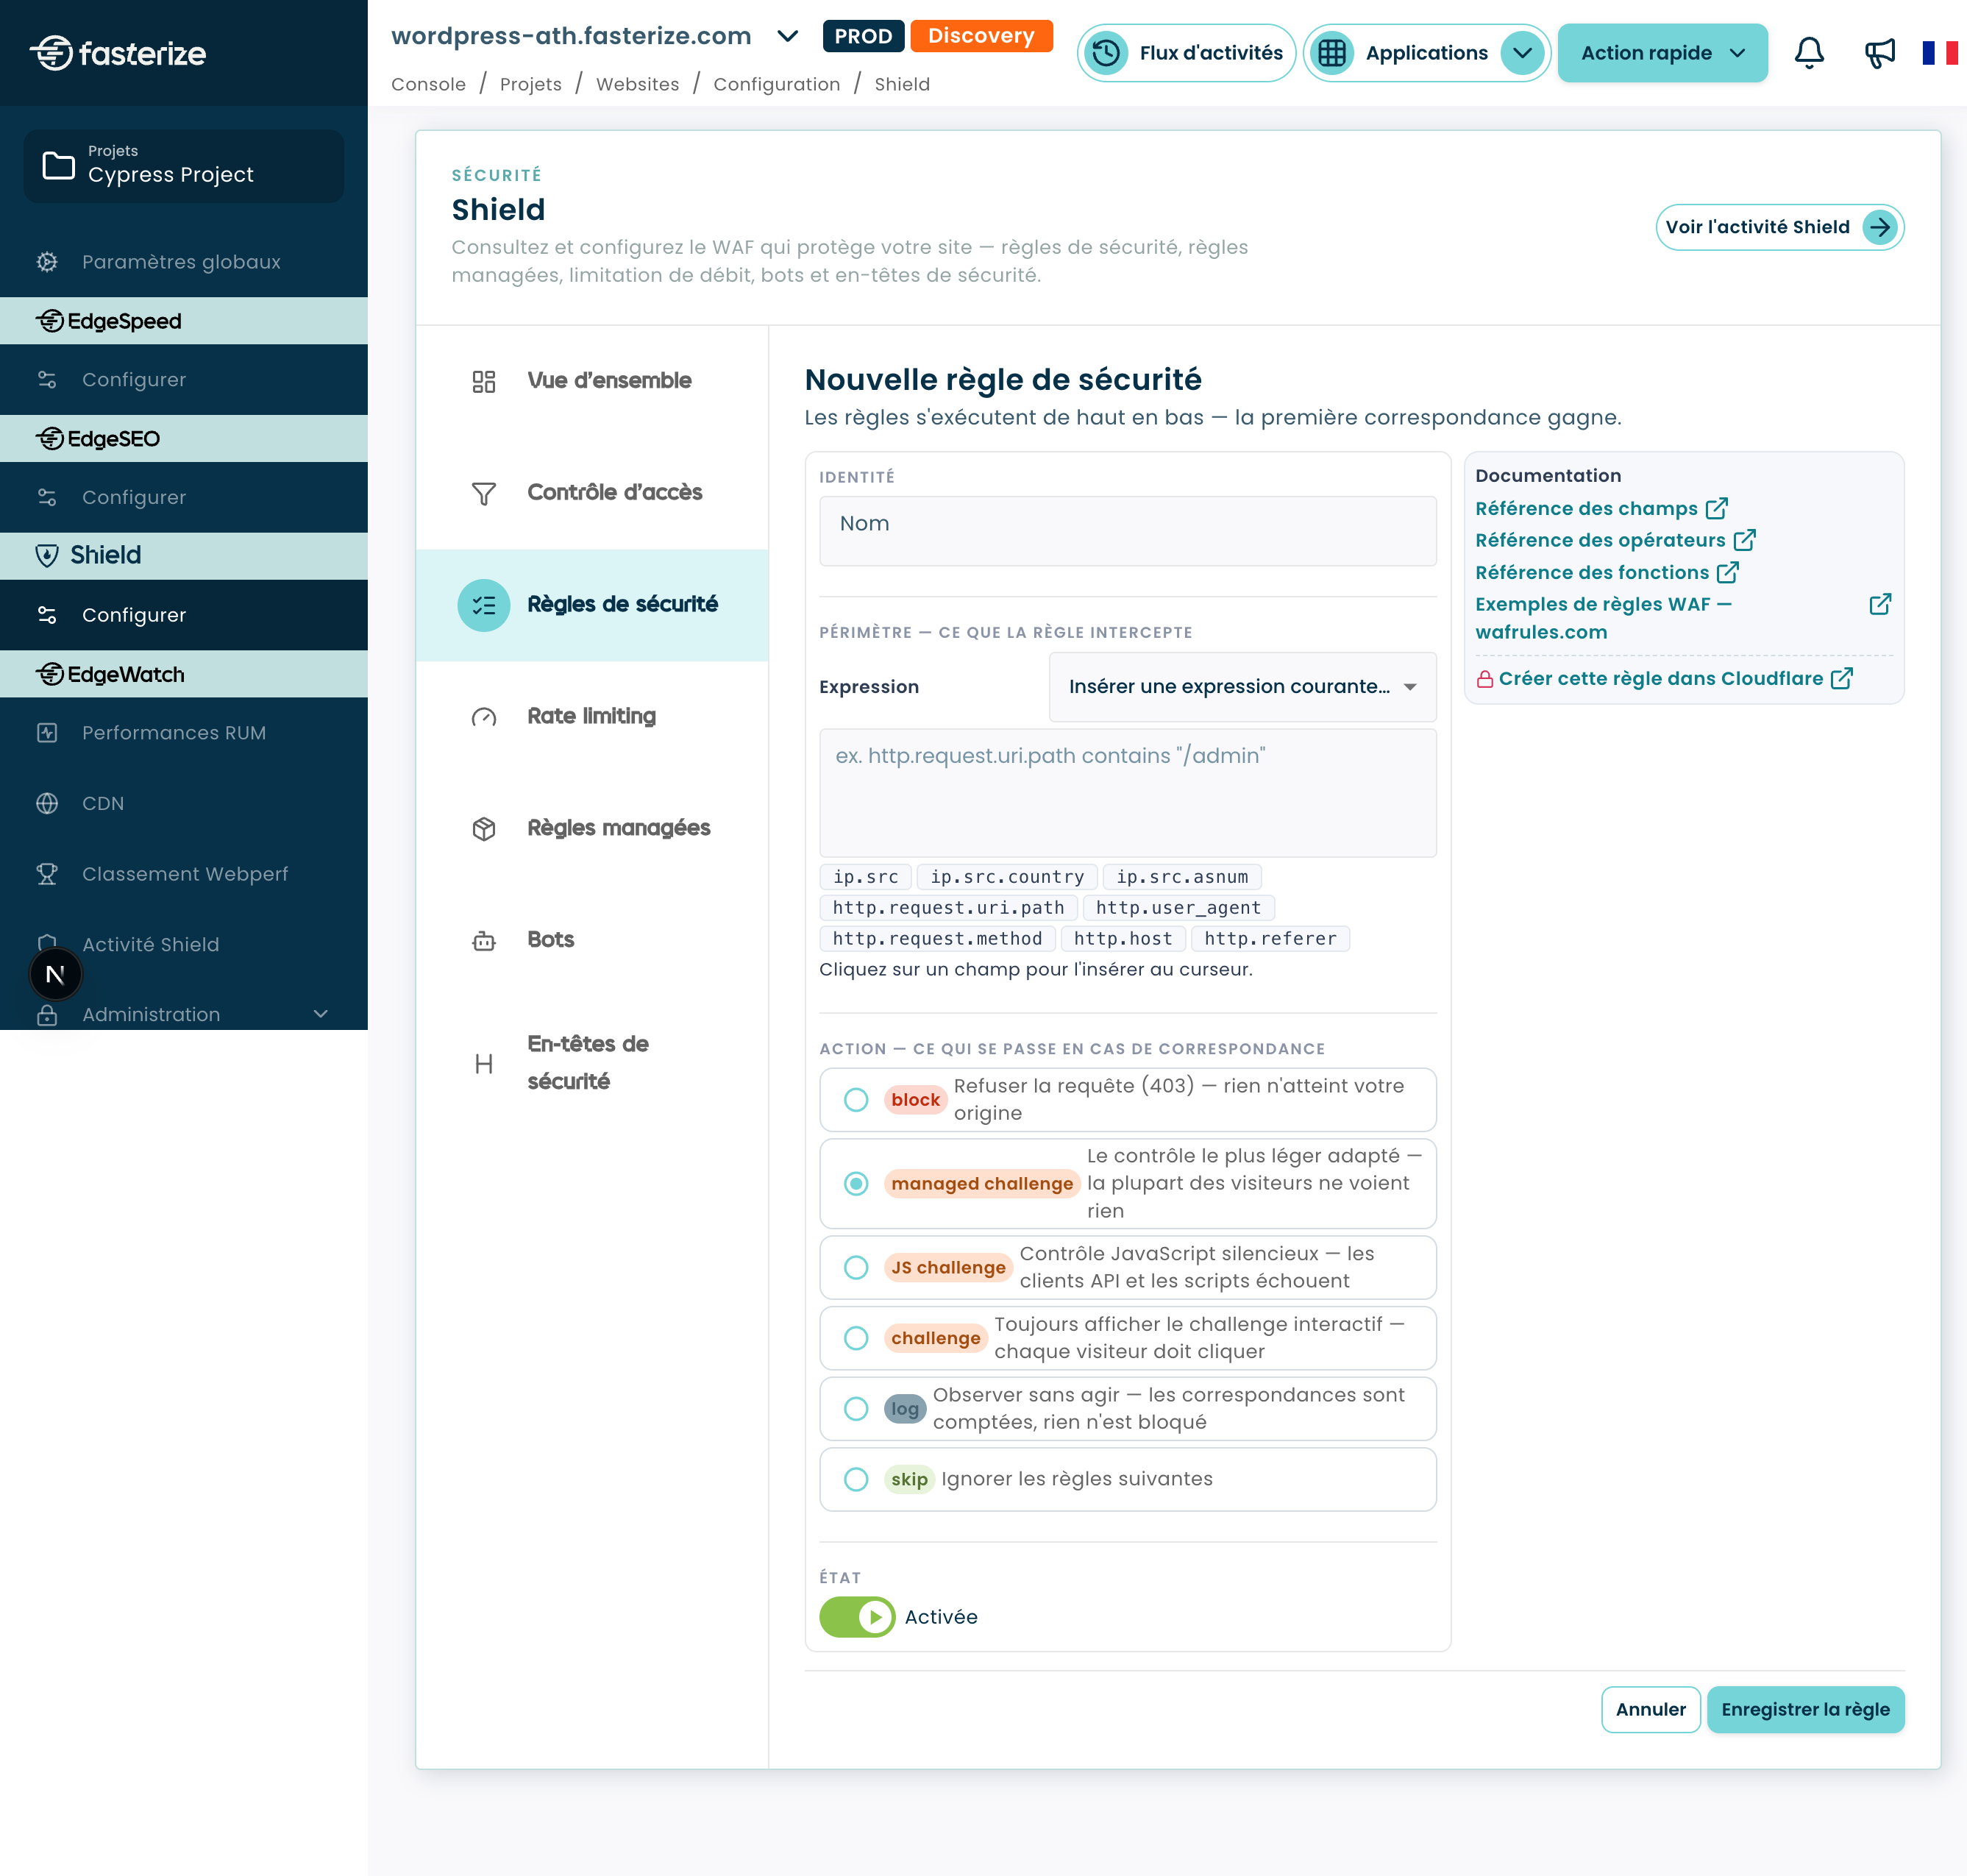
In the editor shown, several fields can be used to build an expression, including:
ip.srcip.src.countryip.src.asnumhttp.request.uri.pathhttp.user_agenthttp.request.methodhttp.hosthttp.referer
This allows you to refine a search using multiple criteria.
The example shown in the console includes the request path, the HTTP method, the Content-Type and the host to precisely target a form.
What actions can be applied to a security rule?
The console offers several actions:
block: rejects the request; the console displays an HTTP 403 response;managed challenge: applies a screening process tailored to the visitor;JS Challenge: applies a JavaScript check;challenge: displays an interactive challenge;log: monitors and records correspondence without interrupting the evaluation;skip: Allows you to bypass the following relevant security measures.
💡 For a new rule, log First, it lets you check which queries match your search term without changing how they are processed. For example, log is not a final action; the following rules continue to be evaluated.
What are named lists used for in expressions?
Some rules displayed in the console use named lists directly in their expressions.
They allow you to refer to a set of values in a condition, rather than repeating all those values directly in the expression.
How do I set up bandwidth limiting?
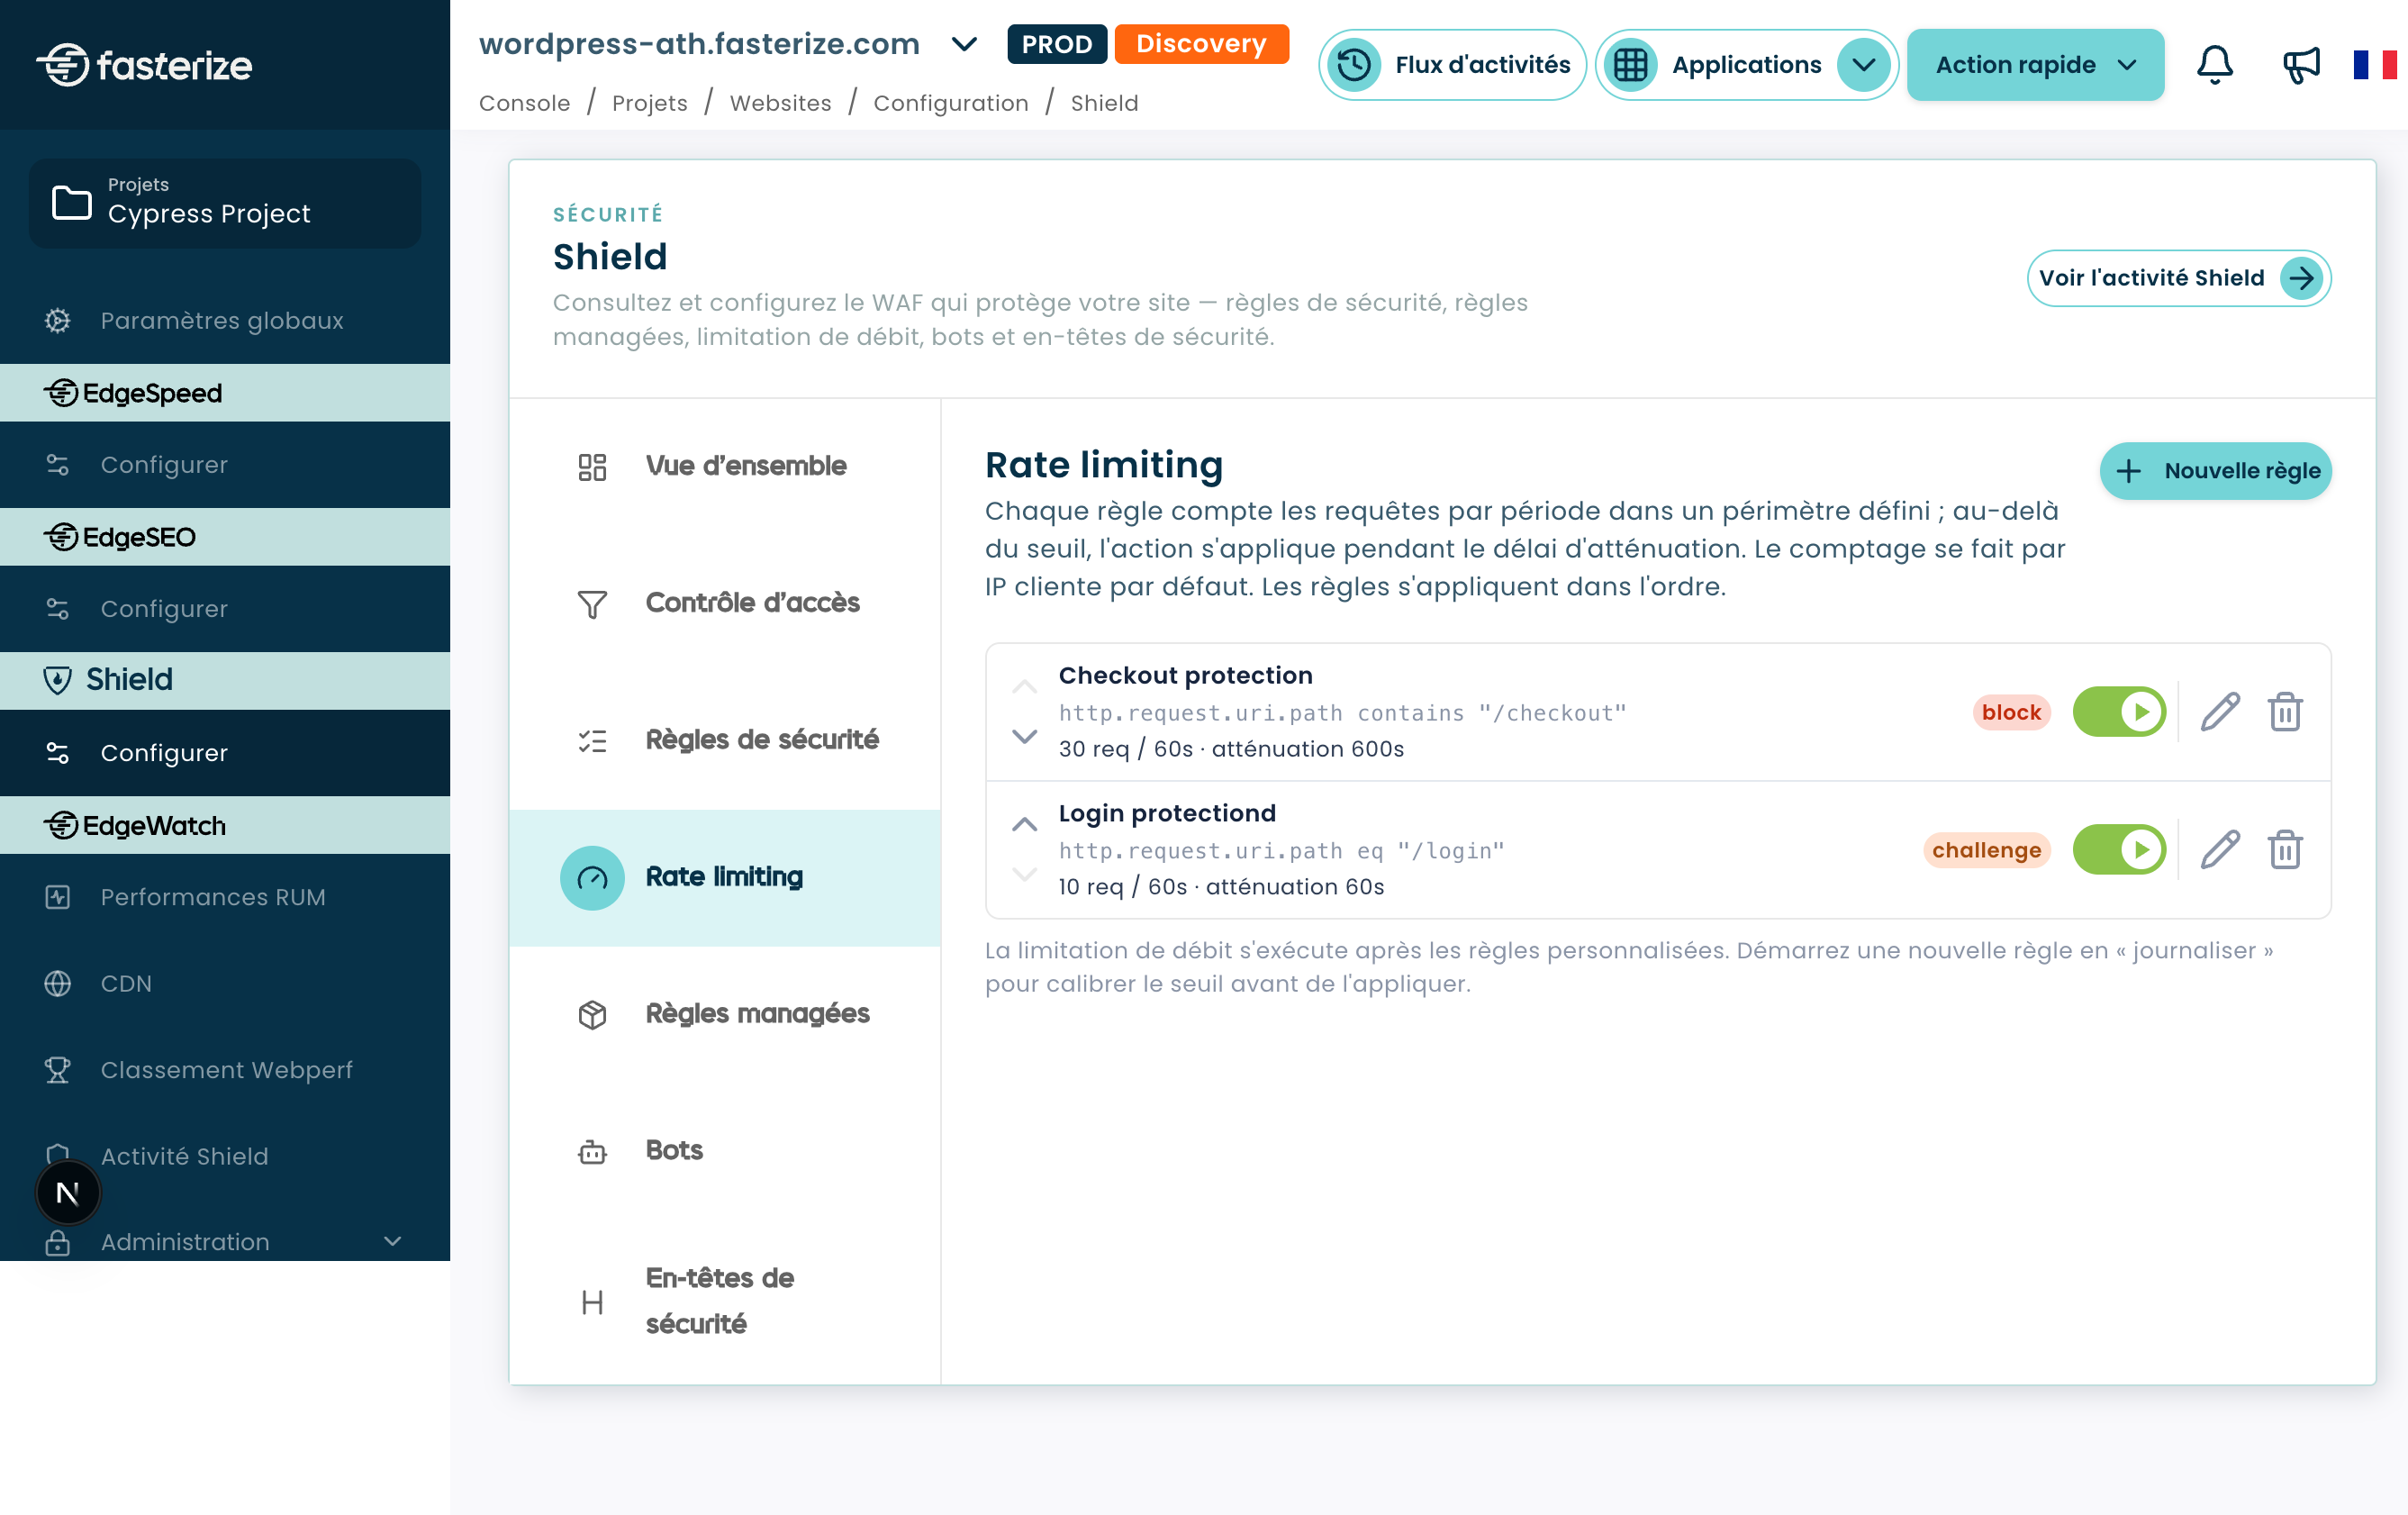
Rate limiting occurs after the security rules.
It allows you to count requests over a specified period and trigger an action when the configured threshold is exceeded.
In the screenshot provided, two rate-limiting rules are configured. The rule Checkout Protection performs an action block beyond 30 requests in 60 seconds, with a reduction of 600 seconds. The rule Login Protection for its part, is taking action challenge beyond 10 requests in 60 seconds, with a reduction of 60 seconds.
A request may not reach this step if a security rule has previously applied a skip.
The console also recommends starting a new rate-limiting rule in logging mode to calibrate the threshold before applying it.
What HTTP status code is returned by the rate limit?
When a rate-limiting rule uses the action block, the returned status is HTTP 429.
This behavior should be distinguished from the block a safety rule, which refers to HTTP 403.
If the action selected for rate limiting is a challenge, the status returned will not be 429.
How do Managed Rules work?
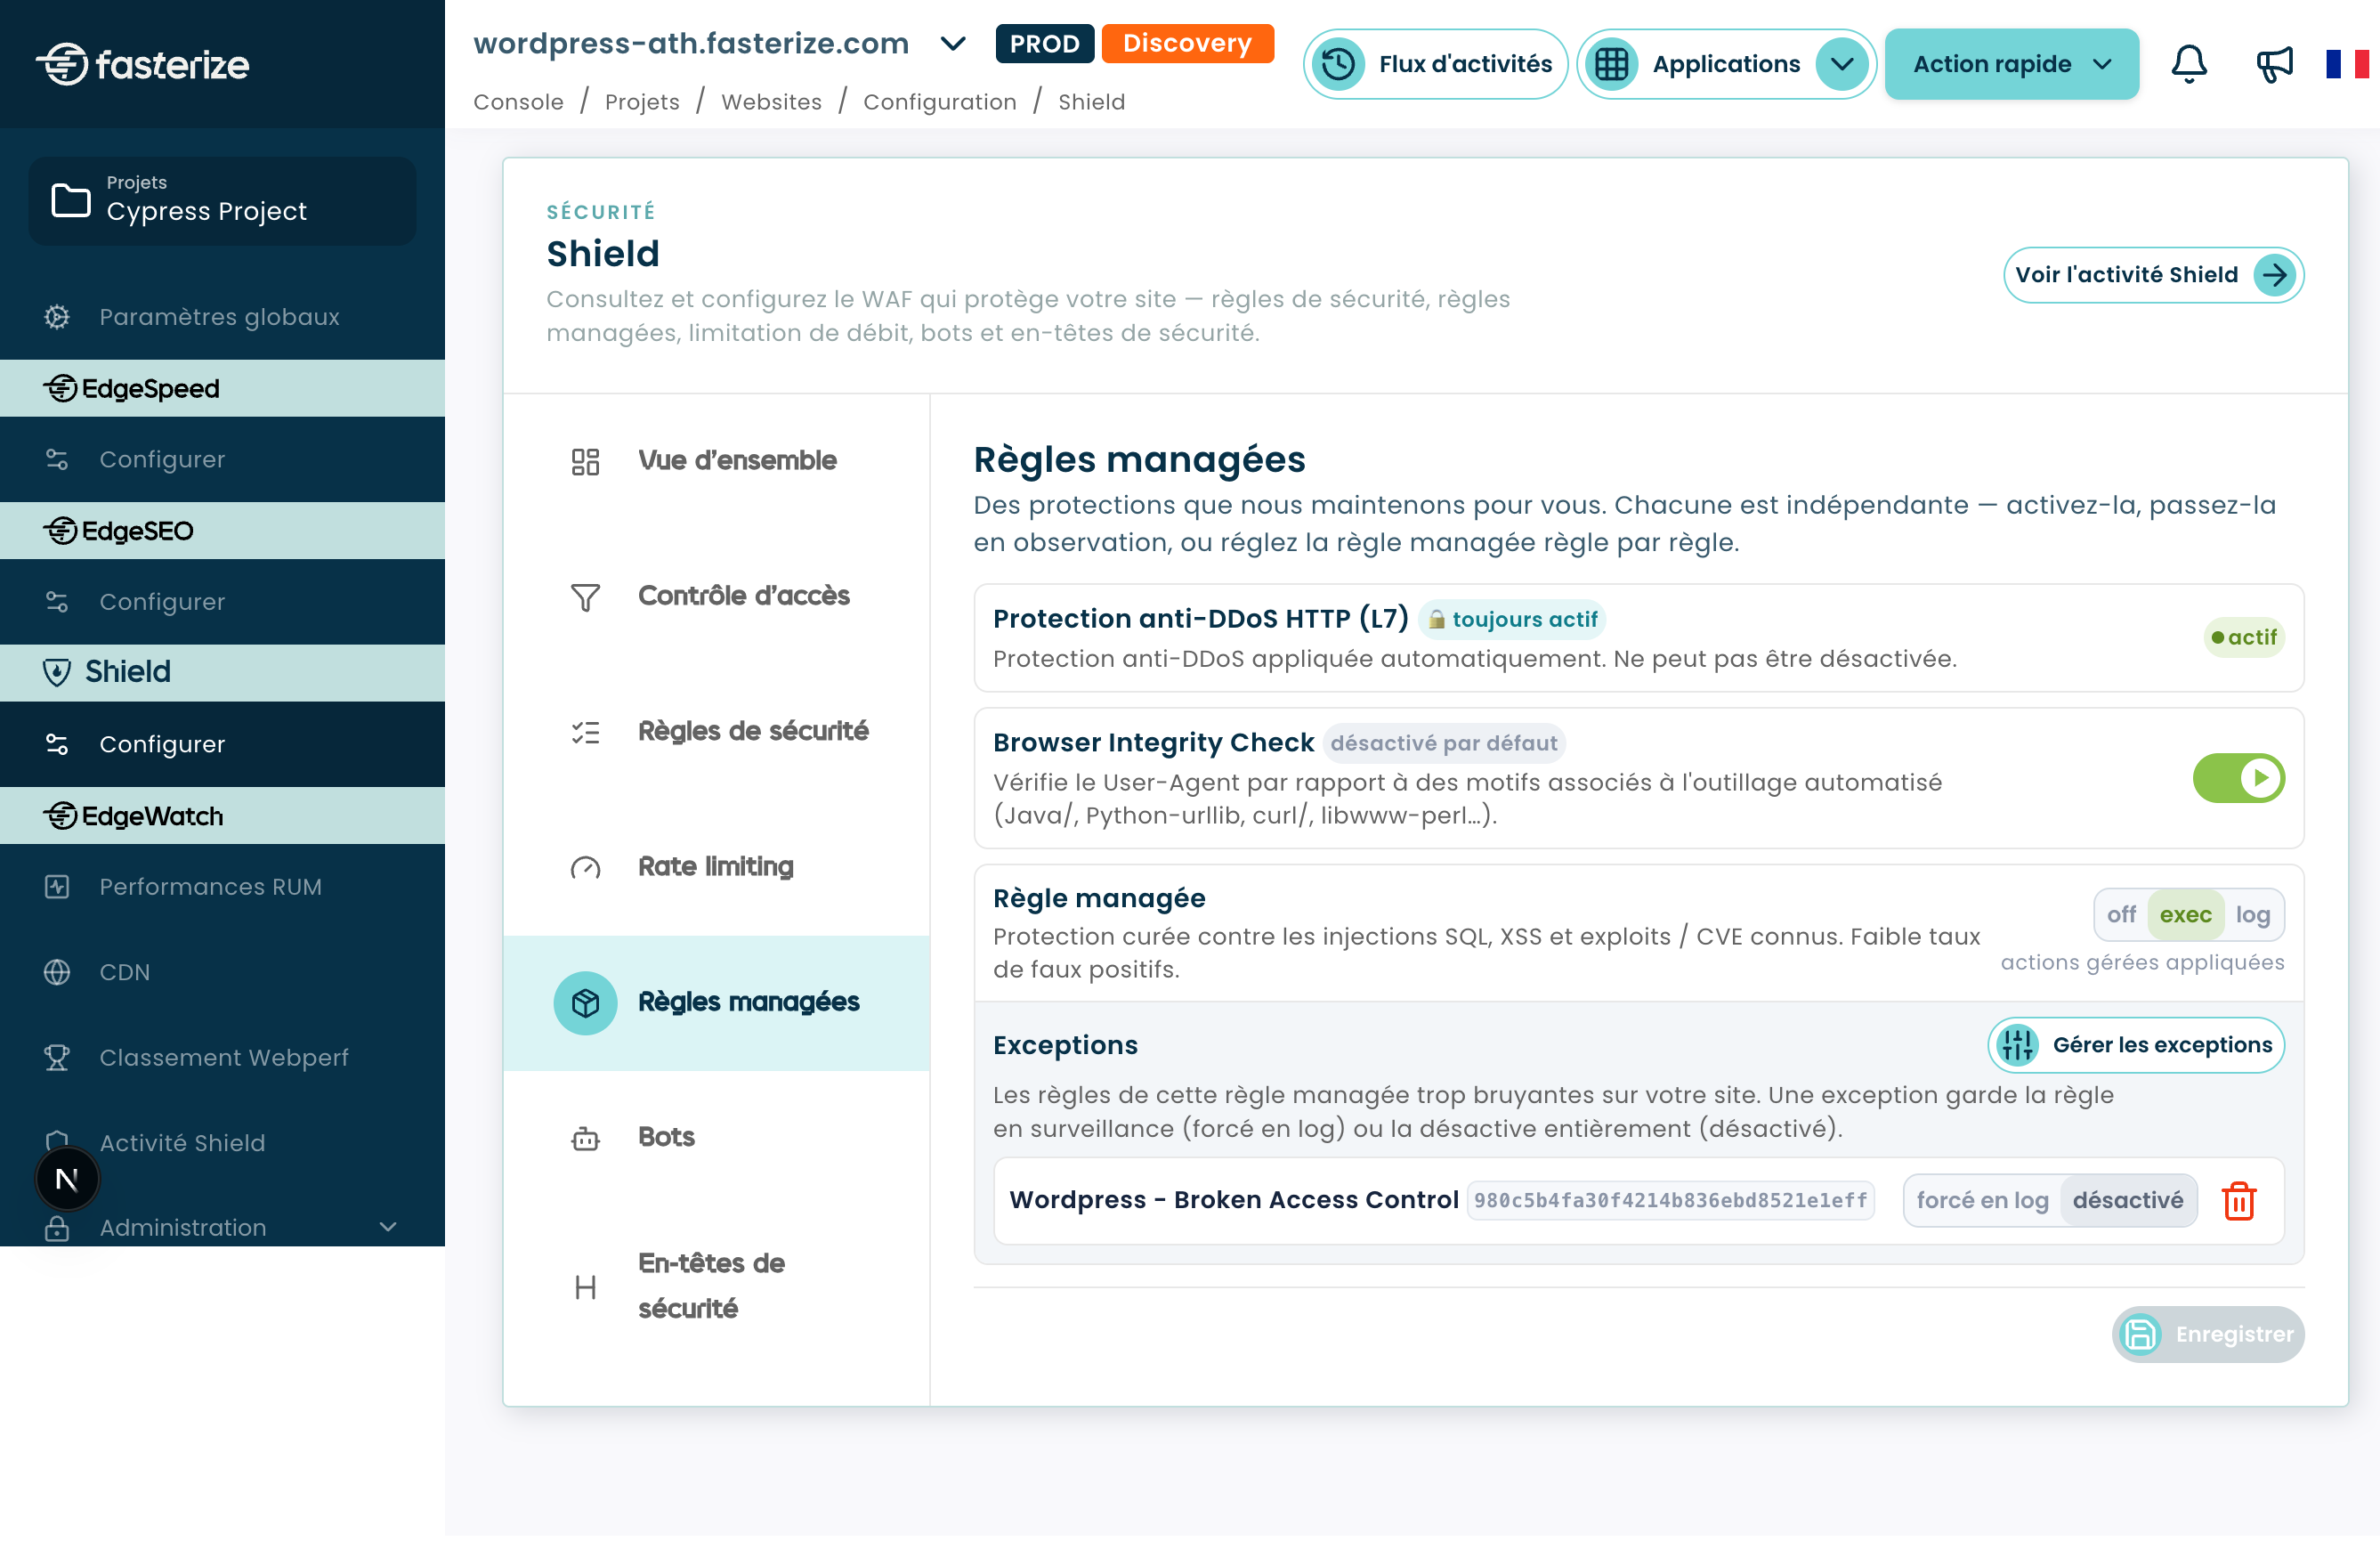
The " Managed Rules " module includes several security measures that are maintained on your behalf.
HTTP (L7) DDoS Protection
HTTP (L7) DDoS protection is applied automatically.
It is listed as always active in the console and cannot be disabled.
Browser Integrity Check
The Browser Integrity Check checks the User-Agent for patterns associated with automated tools.
In the configuration shown, this protection is disabled by default.
Managed WAF
The managed WAF provides protection against various threats listed in the console, including:
- SQL injections;
- XSS attacks;
- Known exploits and CVEs.
Actions related to the managed WAF can be managed from this section.
How do I handle exceptions in the managed WAF?
If certain rules in the managed WAF are too strict for your site, you can use the console to add exceptions.
An exception can be used, for example, to keep a rule under monitoring or to disable it for the relevant scope.
💡 Use exceptions strategically to avoid unnecessarily reducing the scope covered by the managed WAF.
How to Manage Bots and Automated Traffic?
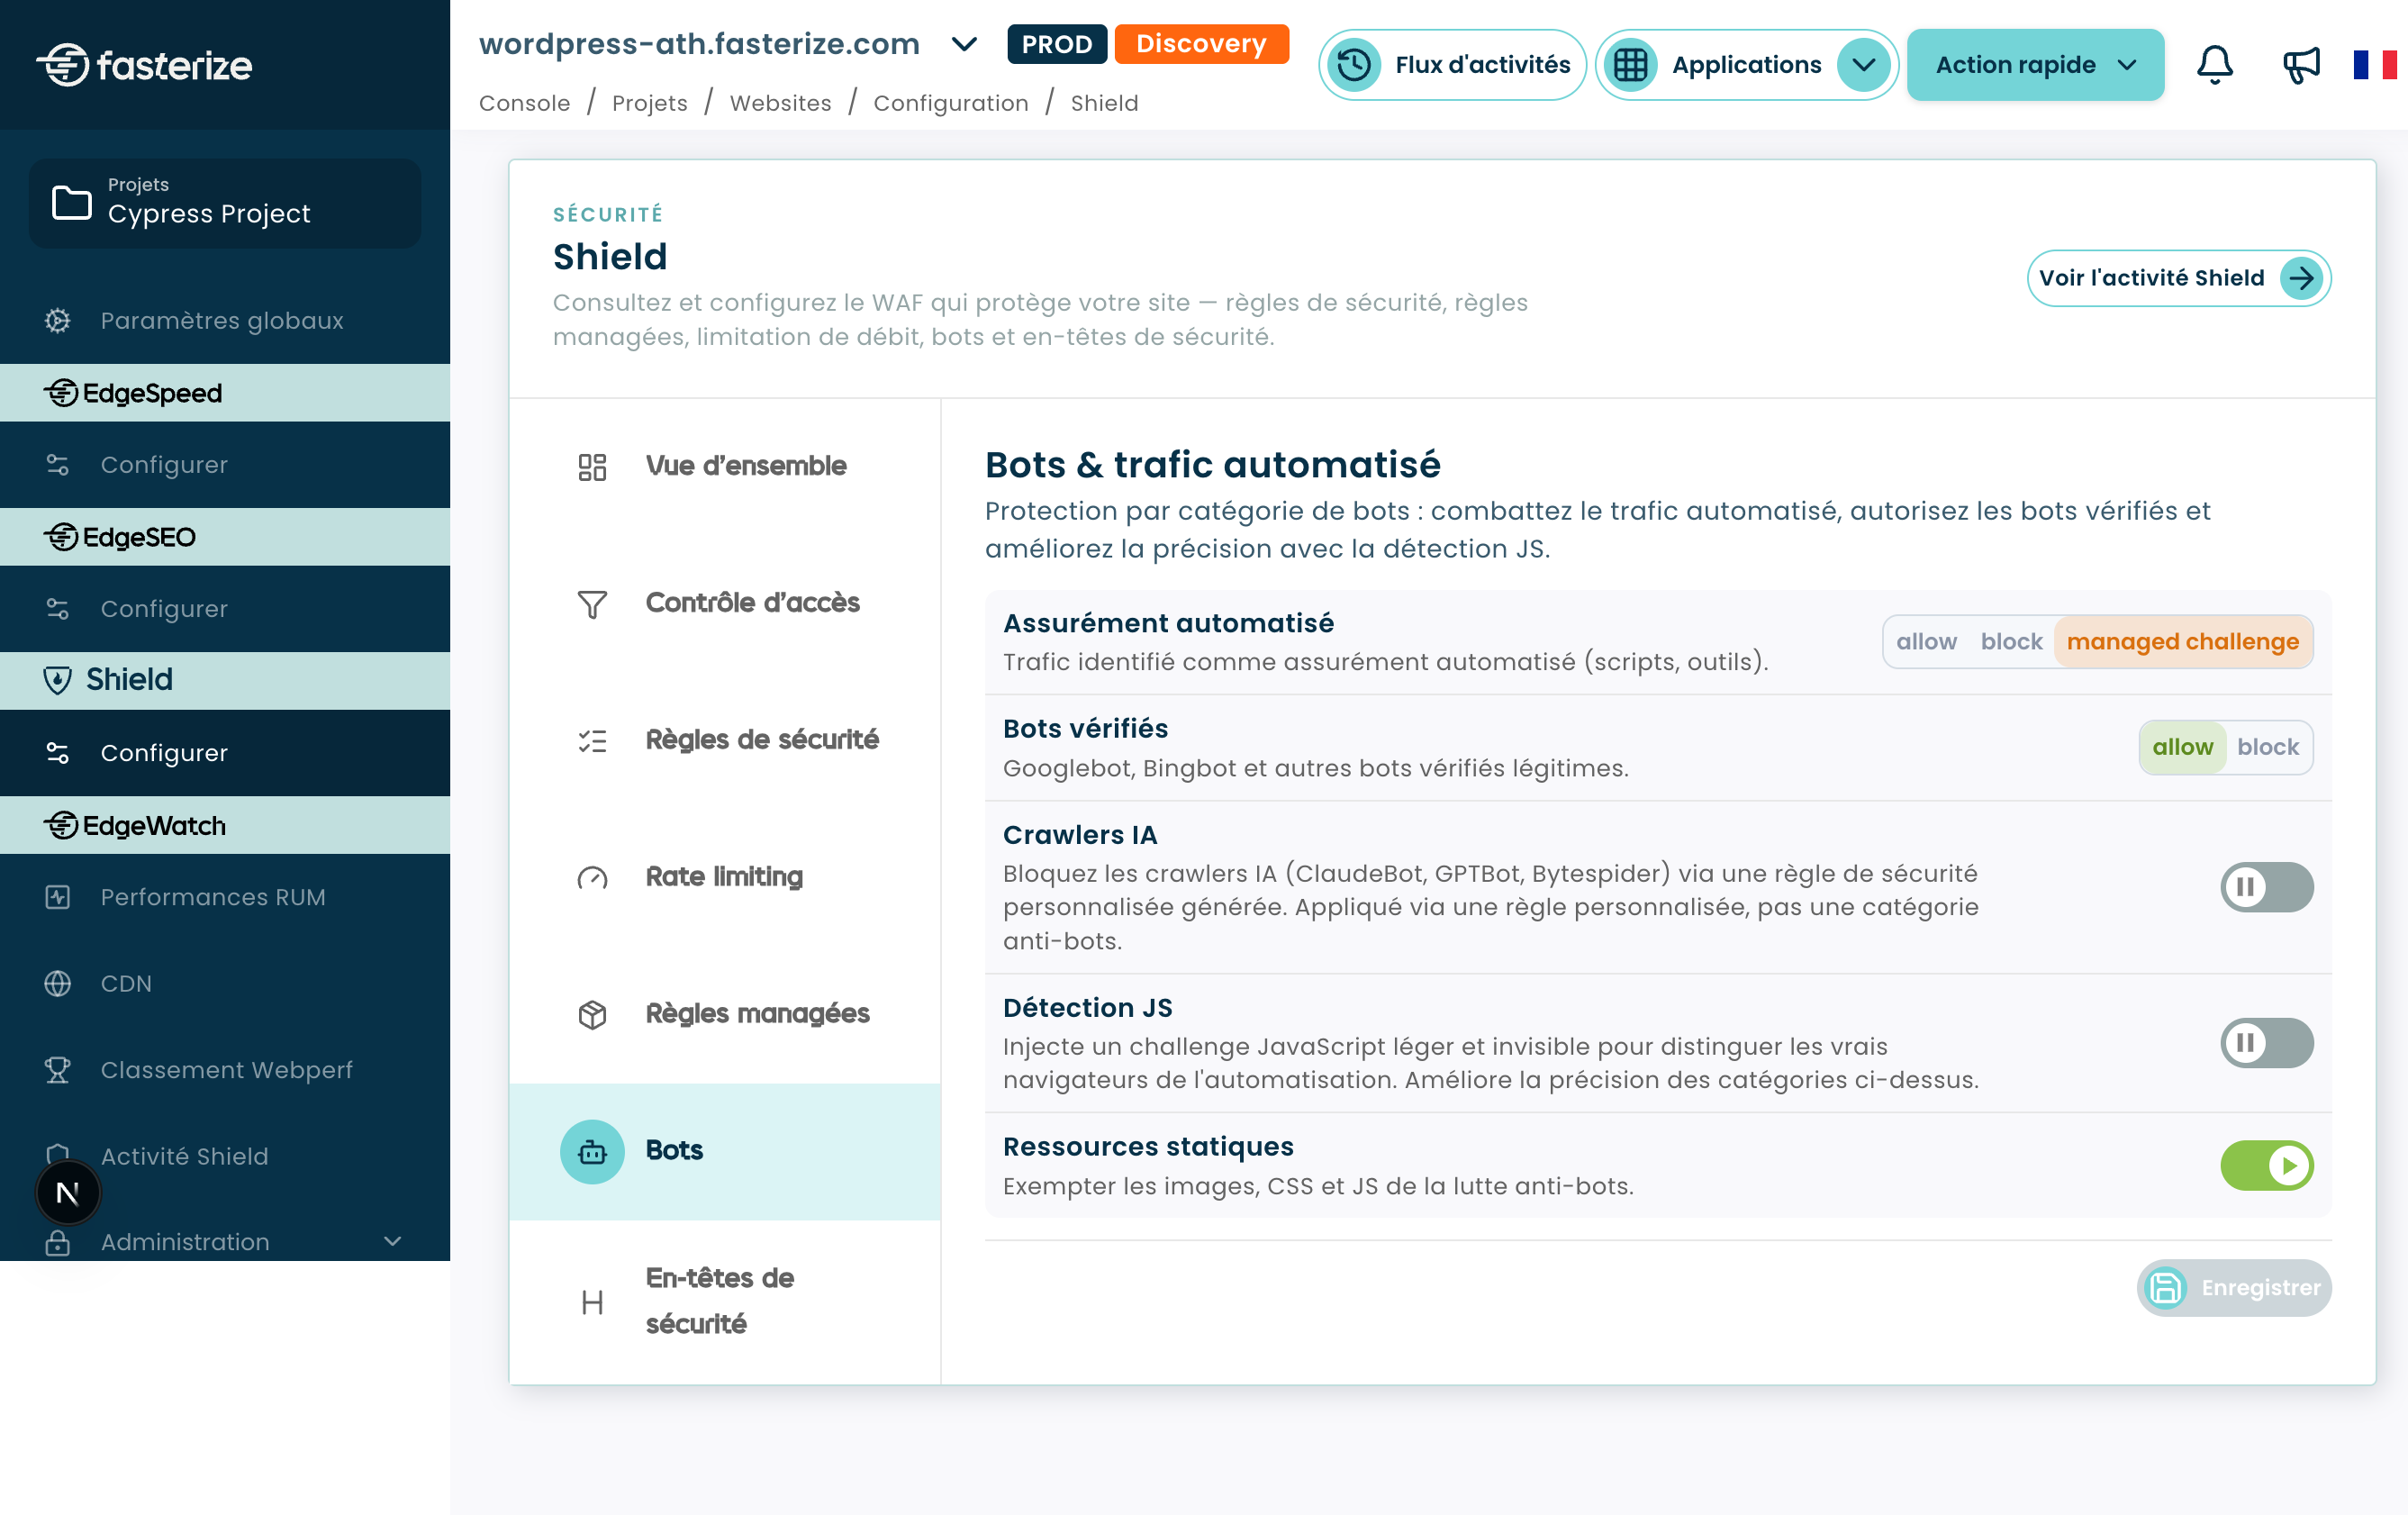
The " Bots & Automated Traffic " section allows you to configure how different categories of automated traffic are handled.
Automated Insurance
This category includes traffic identified as definitely automated, such as scripts or tools.
The default value shown is:
managed challenge
Verified bots
This category applies to legitimate bots verified by the platform, such as Googlebot or Bingbot, as listed in the interface.
The default value is:
allow
AI Crawlers
This protection allows you to specifically target AI crawlers. The interface specifically mentions ClaudeBot, GPTBot, and Bytespider.
A custom security rule can take precedence if it defines a more specific rule for a crawler.
JS Detection
JS Detection injects a lightweight, invisible JavaScript challenge to distinguish browsers from automation.
The default value is:
off
Static resources
This option allows you to exempt images, CSS, and JavaScript from anti-bot measures.
The default value is:
on
How do I configure security headers?
Security headers are applied to the HTTP response sent to the browser. Therefore, they do not constitute a new filtering step in the request processing flow described at the beginning of this article.
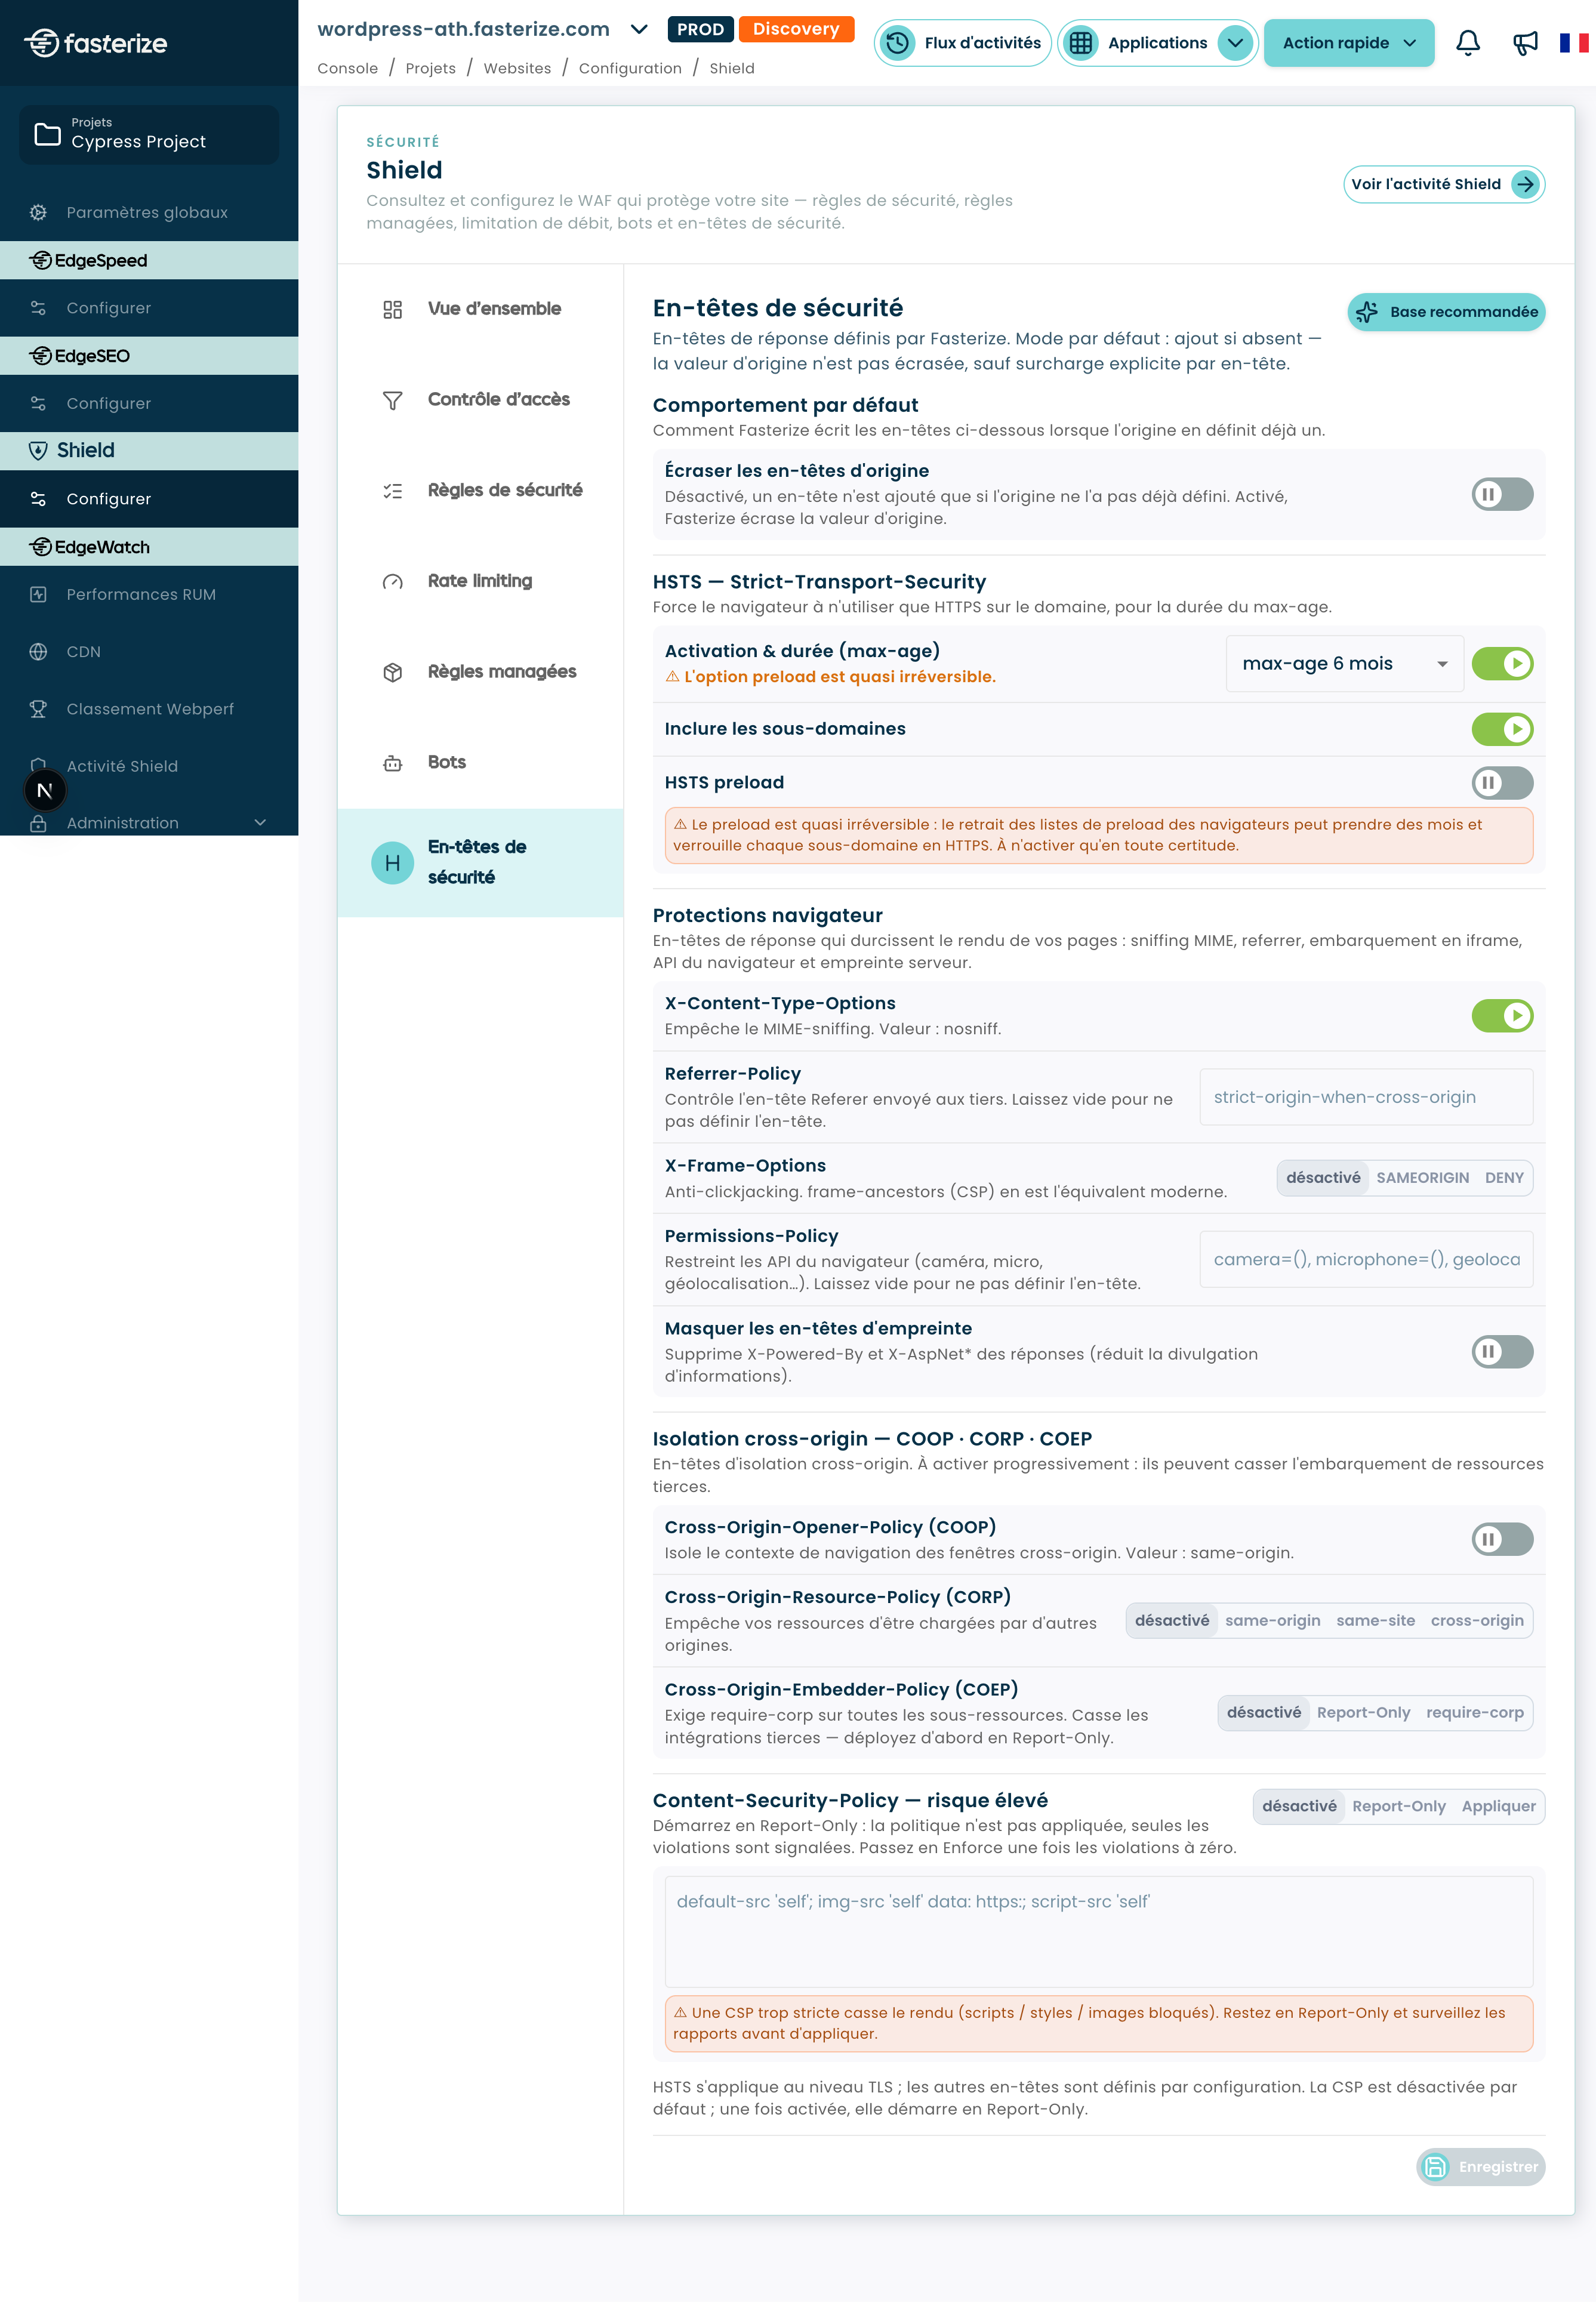
By default, Fasterize adds the configured headers if they are missing. The value set by the origin is not overwritten, unless otherwise specified for a specific header.
The " Overwrite Original Headers " setting allows you to change this behavior.
⚠️ CSP and COEP are two exceptions: they always overwrite the original value, regardless of the setting for “Overwrite Original Headers.”
How do I configure HSTS?
HSTS — HTTP Strict Transport Security — forces the browser to use HTTPS on the domain for the duration specified by max-age.
The console allows you to configure:
- Activation and Duration
max-age; - the inclusion of subdomains;
- HSTS preload.
⚠️ The preload option is listed as virtually irreversible in the console. Removing sites from browser preload lists can take months, and this setting locks subdomains into HTTPS. Only enable it if you fully understand the implications.
What browser security headers can be configured?
Shield offers several headers designed to enhance browser behavior.
X-Content-Type-Options
X-Content-Type-Options Prevents MIME sniffing.
The value displayed in the interface is:
nosniff
Referrer Policy
Referrer Policy checks the information included in the header Refer when navigating to another resource or website.
In the configuration shown, the value is:
strict-origin-when-cross-origin
X-Frame-Options
X-Frame-Options allows you to control how content is displayed in a frame and helps prevent certain clickjacking scenarios.
The options displayed in the console are:
- disabled;
SAMEORIGIN;DENY.
The interface also indicates that frame-ancestors in CSP is its modern equivalent.
Permissions Policy
Permissions Policy allows you to restrict the browser's access to certain features, such as the camera, microphone, or geolocation.
The visual configuration provides examples such as:
camera=()
and:
microphone=()
These directives allow you to disable access to the corresponding features for the defined scope.
How do I hide the fingerprint headers?
Shield allows you to remove certain headers that might reveal information about the technology used by the server.
The interface specifically states:
X-Powered-ByX-AspNet
💡 The header Server is not removed by this feature: the platform blocks its removal. If you still see it in the HTTP response, this does not mean that the masking of fingerprint headers is not working.
What is the purpose of cross-origin isolation protections?
The COOP, CORP, and COEP protections help regulate interactions between your page and resources or contexts from other origins.
These settings should be enabled gradually: as the console notes, they may cause third-party integrations to fail.
Cross-Origin-Opener-Policy (COOP)
COOP isolates the navigation context from windows originating from other sources.
The console displays the following value:
same-origin
Cross-Origin Resource Policy (CORP)
CORP controls which sources are authorized to upload a resource.
The options displayed in Shield are:
- disabled;
same-origin;same-site;cross-origin.
The choice therefore depends on the level of cross-origin sharing expected for your resources.
Cross-Origin Embedder Policy (COEP)
COEP manages the integration of cross-origin resources into your pages.
The available options are:
- disabled;
Report-Only;require-corp.
⚠️ COEP may break certain third-party integrations. Enable it gradually and check the behavior of the resources used by your site.
COEP is also one of the headers that always overwrite the originally defined value.
How can you gradually roll out a Content Security Policy?
Content-Security-Policy, or CSP, allows you to define the sources from which various resources can be loaded.
The console explicitly identifies this configuration as high-risk.
A policy that is too restrictive can, in fact, block scripts, style sheets, or images that are necessary for your site to display properly.
Shield has three states:
- disabled;
Report-Only;- Apply.
💡 Start by Report-Only. The policy is not enforced at this point: violations are flagged, allowing you to monitor the system's behavior before enforcing the policy.
Once the violations have been analyzed and the policy has been adjusted, you can move on to implementing it.
⚠️ CSP always overwrites its original value, regardless of the global setting “Overwrite Original Headers.”
How can I track Shield's activity?
The " View Shield Activity " button provides access to protection activity tracking.
It is important to distinguish between the different views in order to correctly interpret the information presented.
Customer Reputation
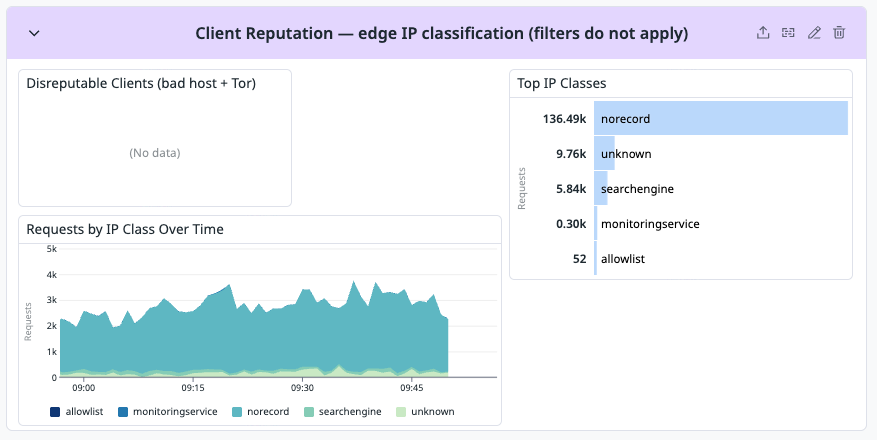
The Client Reputation view displays reputation information associated with the observed traffic.
Counters for blocked or limited responses must not be assigned to this view.
Blocked and Throttled Responses
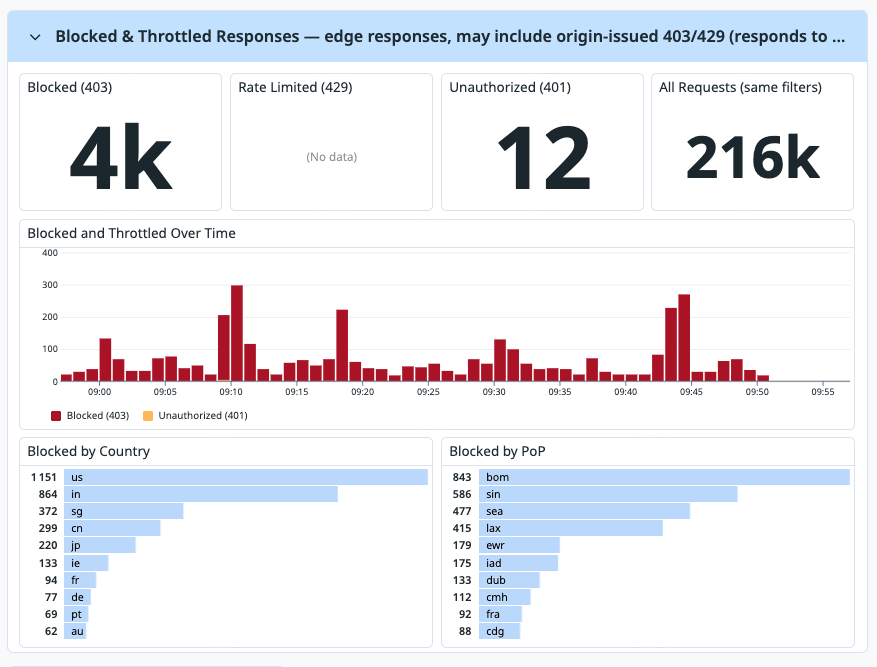
The " Blocked & Throttled Responses " view allows you to monitor responses associated with blocked or throttled requests.
In particular, it allows us to observe:
- HTTP 403 responses;
- HTTP 429 responses;
- HTTP 401 responses;
- the corresponding total volume.
This makes it possible to assess the impact of the safeguards after they have been implemented and to identify any increase in blockages or restrictions.
What best practices should you follow when configuring Shield?
Shield allows you to combine multiple protection measures. To keep your configuration clear and avoid unintended consequences, proceed step by step:
- Start by understanding the order in which the protections are executed;
- Check the order of your security rules;
- use
logwhen you want to review the mappings before changing how traffic is handled; - Keep in mind that
logdoes not interrupt the evaluation of the following rules; - use
skipin a targeted manner, since it can bypass several downstream safeguards; - Set your flow rate limits before applying an action;
- Prioritize specific exceptions for the managed WAF;
- Start CSP in
Report-Only; - Gradually enable COOP, CORP, and COEP;
- Carefully check your configuration before enabling HSTS preload;
- Check the Shield activity after every major change.
Conclusion
Shield helps you build your site's security posture by combining several independent components: Access Control, Security Rules, Rate Limiting, Managed Rules, Bots & Automated Traffic, and Security Headers.
To configure these protections effectively, three key steps are essential: understand where each protection comes into play, know what action it takes, and observe its behavior before gradually tightening the configuration.
The execution order deserves special attention. A safety rule that uses skip, for example, can affect several downstream safeguards. Conversely, a rule that uses log allows you to monitor traffic while the evaluation continues.
By proceeding step by step and monitoring activity after each change, you can tailor Shield to the actual needs of your traffic.